Table of Contents
JMU which stands for Java Media Utility has been developed to provide a java API and implementation to extract data out of an MPEG(1/2) stream.
The main target for this project is to provide java and C++ developers with the possibility to easily access mpeg1/2 streams to extract frames and other mpeg data out of it.
For the moment the framework is able to extract frames, motion vectors and DCT coefficients. More sophisticated features could be added in future if someone would require them. But nothing can be promised now.
Secondary, but not less important, objective of this project is to implement a pluggable framework to easily plug custom algorithm to classify video frames. The pluggable framework is not describe here.
Finally the project provides the capability to write MPEG-7 XML descriptors in order to save information about the stream content using mpeg7 descriptors.
The JMU framework uses a C++ OO layer which wraps ffmpeg C library to access mpeg data. The C++ framework - called CMU C++ Media Utility - has been developed to provide an easy and object oriented approach to access ffmpeg functions. Using this framework, JNI layer result to be easier to develop, leaving much of the memory management and specific function implementation, to the CMU layer. CMU layer itself can be used alone to access mpeg streams easily respect to direct use of ffmpeg code.
JMU would promote a C/C++ based library to handle media streams containing audio and video. Around the C/C++ core a java wrapper is developed to provide capability to handle media streams to both C/C++ and java developers.
C/C++ component (CMU) is composed of two sub-components: the core and the mpeg implementation library. The CMU-core component is a set of generic interfaces and a set of utility classes. Use of interfaces is the key element to have a unique access point to deal with different specific implementations. CMU-core is released as a static library. The CMU-mpeg sub-component extends the CMU core in order to provide a specific mpeg implementation. CMU-mpeg uses ffmpeg libraries to access media streams. Where ffmpeg functionalities are missing custom specific implementation would be provided. Figure 1 shows the whole JMU architecture.
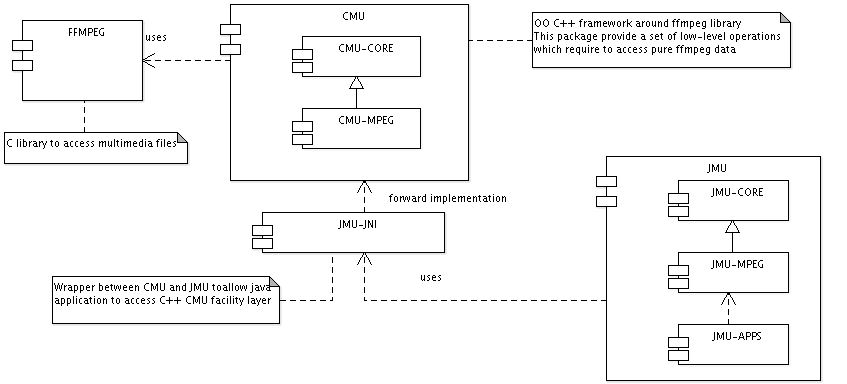
The same approach is used to realize the java counterpart. In java implementation (JMU) we have two sub-components: the core and the mpeg implementation. As always the JMU-core provides a set of interfaces and common utility classes to deal with media streams. JMU-mpeg provides an mpeg specific implementation of the core. In this case JMU-mpeg wraps around CMU to implement required services.
The engine framework (EF) has been designed to allow users to built custom image processing chains (IPC) or graph in an easy and configurable way. Using IPC users can chain custom modules (or processes) to process video stream images. The JMU framework contains some pre-developed modules/processes to be used inside IPC to provide basic services such as frame reader and writer. The provided IPC processes are reported below::
Frame reader process: A basic process to read frames out of a video stream and to put them into the EF processing chain.
Mpeg 7 writer process: A basic process usable to write features in mpeg 7 XML file
Histogram extractor: Basic process to extract histograms (red, green and blue) out of the video frames
Cat classifier: Basic cat classifier module which uses simple histogram errors to identify cats in video sequences.
In IPC each custom process can be chained to other custom processes to form a generic chain of processing. Each custom process (CP) reads from many inputs and writes to a single output buffer. Each element in the output buffer represents a product of the process. Any generic java class can be used as process product only if the class extends IProduct interface. Each CP must implements IProcess interface to be considers a engine process and to be used inside the engine framework. Each CP must be aware of the java class type used by its inputs to provide products to consume. It is important for each process class to deeply describe the class behaviour in java doc. Important aspects to document are the class type of the produced products and eventually the class type used for shared objects.
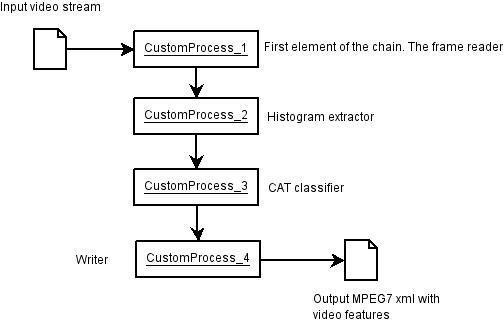
Above figure shows a very simple example of EF processing chain. The first process reads frames out of a video stream and puts them in the processing chain. Second process extracts histogram for each frame. CAT classifier (process 3) analyzes histograms to identify cats inside the video stream. Each time a new cat is discovered, the process pushes a new product inside its output buffer. Finally custom process 4 uses CAT information to store XML data into the output mpeg7 file.
More complex IPC can realized. There could be IPC where a given process can receive inputs from many other custom processes; as reported in following figure.
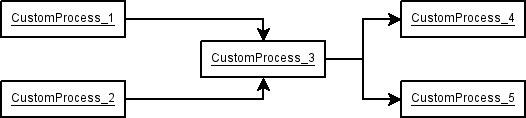
Figure above shows a more complex IPC. In this case CP3 processes inputs from two other CPs. The output produced by CP3 is then processed by both CP4 and CP5. If a process receives data from two or more other processes, it is important for the target process to control the way to extract products out of the processes. The situation where a process provides input to many other processes is a little bit more complex. In this case the problem is to find a mechanism for the chained processes (those which reads from the first one) to avoid to steel products one each other. Moreover it is impossible for the reader processes to decide when remove the last product out of the output buffer of the producer. The last product must be removed from the producer only when all the reader processes have read it. But how knows this? Here there are two basic solutions both well document in following paragraphs: SIA and MIA. For the moment the only supported architecture is MIA (Multiple Instances Architecture). With MIA all the situation where a process produces products for more than a single chained process, the producer process is duplicated so there would be as many instances as many processes requires to read its output buffer. The MIA solution duplicate process instances maintaining the overall IPC topology, and at the same time increase performance. The only drawbacks is the increase of the amount of required resources.
Following paragraphs details the EF providing class model and sequence diagram to brought the user to the life cycle of custom developed processes.
This section presents the class model used to implement the engine framework. The class model is reported in following figure.
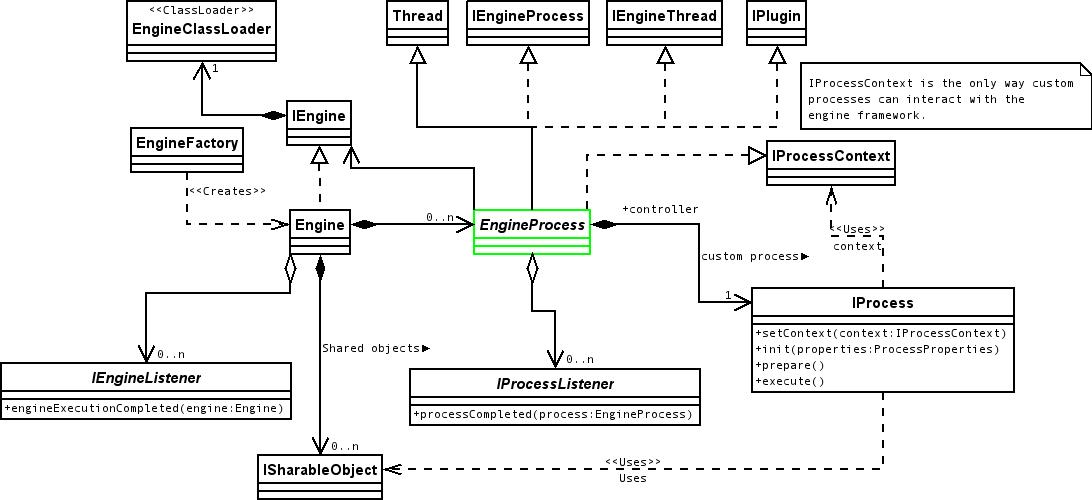
The engine framework is essentially based on two classes and one interface: the Engine, the EngineProcess and the interface IProcess. The Engine represents the container of all the running processes. Inside an application there could be as many engine instances as you want. Each engine process is contained in a single engine. There is a complete isolation among engines, so running processes are isolated in between engines. An EngineProcess is a utility class which wraps most of the common services required to execute a process inside an engine. Grouping all these services in a class avoid to reproduce them in each custom developed process. Interface IProcess is used to identify a custom process which is plugged into the EngineProcess instance. To create a custom process, a user must write its own class implementing IProcess interface and providing custom implementation for the following few methods:
setContext(): used by the EF to set the process execution context;
init(): used by the EF to pass configuration properties to the custom process implementation.
prepare(): used by EF to notify the CP that it should prepare itself to be executed.
execute(): invoked by EngineProcess each time a processing cycle must be execute.
The only way a CP can communicate with the EF is through the process context (IProcessContex interface). The context is passed by the EF while creation phase using setContex() method right after the CP instance has been created. It is not required for custom processes to extends Thread to be threaded. Threading is insured by EngineProcess which is itself a running thread which periodically invoke execute() on CP controlled instance. EngineProcess takes care to terminate the thread if the input CPs have terminated and associated buffers are empty. Custom processes can control termination by means of the return value of method execute(). EngineProcess controls return value of execute() each time the method is invoked. If returned value is TRUE, the EngineProcess terminate thread execution and notifies the event back to the parent engine.
Each engine has its own class loader which is used to create CP instances. Engine is configured passing a configuration folder. Configuration folder contains both engine configuration files (more on this later on) and custom developed CP classes inside one or more jar files. Engine class loader loads classes using jars present in engine configuration folder. This way it is possible to autonomously develop CP classes and deploy them without problems.
To share information among CPs the engine provides a mechanism based on shared objects. Each CP can share data among other processes just implementing ISharableObject interface. Using IProcessContext it is possible for the custom process to store the shared object inside the engine-wide dictionary. The custom process must provides the shared object look-up key. To access a shared object from within other CPs it is required to know both the shared object look-up key and the unique name of the CP which share the object. Using both CP unique name and look-up key provide the possibility for two CPs to share objects with same key. In this case distinction in between shared objects is insured by unique custom process name.
Both Engine and EngineProcess provide a listener based mechanism to asynchronously send events to registered listeners. An application manager class can register itself with an engine as listener. The Engine would send back events to the class notifying various engine events.
This section describes the phases followed to create a new engine process instance. The only way for an application which uses engines to create an engine instance is through the use of the EnigneFactory class. EngineFactory is a singleton class which creates new engine instances. The engine factory is also a plug-in so the specific implementation can be changed without changing overall JMU project code, but simply providing a custom plug-in implementation.

Above figure shows the sequence diagram followed while engine creation. The engine structure is completely described using configuration files. More about configuration files can be found in following sections. Configuration files contain information about all the custom process to create for a given engine instance.
The first step in order to create an engine instance is to load configuration files. A this point the empty engine instance is created providing engine configuration folder. The engine configuration folder is required to the engine in order to properly initialize engine class loader instance. The engine class loader would be lately used by engine factory to create custom process implementations.
Once the engine instance is available, the engine factory starts over processing the information concerning the custom processes. For each configured custom process, the engine factory proceeds as follow. First the engine factory creates an instance of EngineProcess and adds it to the engine. When an engine process is added to the engine, the engine first registers itself as engine for the process and secondly registers itself as listener for the given process. Registering as listener for the process instance allows the engine to receive events about custom process termination. These events are used by the engine to release all the resources allocated for that custom process.
At this point the engine factory uses engine class loader to create an instance of the custom process. The custom process instance is create runtime by the engine class loader using the class name provided with configuration files. Right after the creation, the process context is passed to the process invoking setContext() method. The method init() is invoked right after setting context passing to the custom process instance all the configuration properties present in the configuration file. The init method is used by the custom process to register configuration parameters and to load resources if required. A typical configuration parameter can be the name of the file for a writer or reader or moreover a threshold value. It is important inside init() method do not access shared objects. Beside init() method can be used to prepare and store shared objects inside the engine.
During third step, engine factory registers the input processes invoking addInput() method on the newly created engine process instance. To note that inputs are not registered with custom process, but with EngineProcess class. Custom process instances can access input processes using process context. To lookup an input, the CP must known the unique name of the input process required.
Finally, during last step, the engine factory sets the custom engine process for the engine process instance. After last step, the engine is ready to be started invoking start() method.
Previous section describes the engine instance creation phase. This section details the life-cycle of a custom process before, during and after process execution.
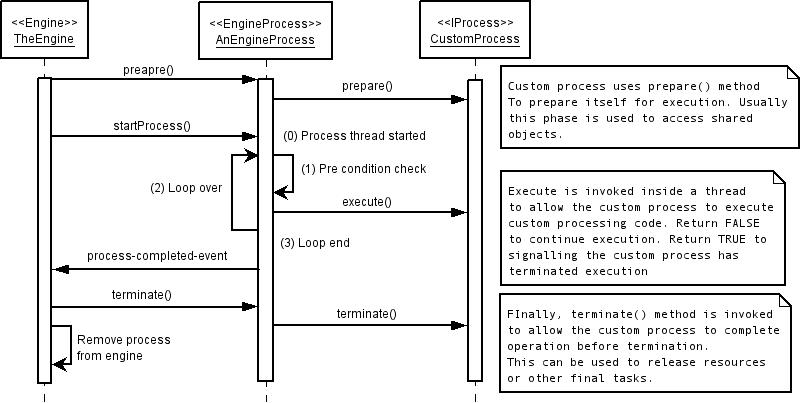
Above figure shows the sequence diagram followed while starting, executing and terminating a custom process.
When the engine instance is started, the method prepare() is invoked on each engine process registered with the engine. EngineProcess class forward method to the controlled custom process instance. The prepare() method is used to notify CPs to be ready to start to be executed. This method can be used by CPs to complete precess initialization. For example this method can be used to access shared objects or to execute other useful code right before process execution.
After method prepare() has been invoked on all the registered engine processes, the engine starts execution. Execution phase is completed invoking startProcess() method on all the registered engine processes. The EngineProcess implementation uses startProcess() method to start the engine process thread. While executing engine process thread the method execute() is invoked to allow controlled CPs to perform their job. Before invoking execute() method, the EngineProcess executes some useful controls to validate running status. Before to invoke execute() method, the engine process controls that at least one of the registered input processes is still running or that the associated buffer is not jet empty. If there are no more input processes running and all the associated buffers are empty, the engine process avoid to invoke execute() sending a processCompleted event to all registered listener. If the there are still input processes running or the associated buffers are not jet empty, the engine process invoke the method execute() on the controlled custom process. CPs use this method to perform their duty. When the CP has no more reasons to remain alive, the CP must return TRUE when the method execute() is invoked. The engine process uses execute() return value to determine if the running thread must be kept alive or not.
Whenever the engine receive a "process-completed" event from an engine process instance, the engine release the process instance and invoke the method terminate(). Engine process forward method invocation to controlled CP. CPs use terminate() method to prepare them self to shutdown. Usually this method must be used by CP to release all allocated resources: memory, files etc. Finally the process is removed from engine.

Figure above shows the engine process state diagram. The figure reports all the statuses the engine process pass through during its life-cycle. The first status is "Created" available right after the method init() has been successfully invoked. The "Prepared" status is reached right after the method preapre() has been invoked. The state "Running" is reached the first time the method execute() is invoked. The process remains in "Running" state till the engine invoke the method terminate(). Finally the engine release the process and the instance can be terminated.
The status "Running" is kept till all the process inputs are running, associated buffers are not empty or the method exectue() return TRUE. If an exception is thrown while any of the aforementioned phases, the engine stops the starting phase and throws an exception back to the main application.
Engine framework is a flexible architecture which allows developers/users to provide IPC (Image Processing Chain) to be created using a set of configuration files. All the configuration files must be located in a common folder called "configuration folder" (CF). Inside the configuration folder, which is unique for each engine instance, the engine look-ups for both: image processing chain configuration files and all the jar files with custom process implementation. Jar files are required by engine class loader to create instances of custom processes.
Engine IPC configuration can be stored in a single configuration file, or it can be spread on more than a single configuration files. Given CF folder, all the files with .xml extension are considered configuration files. If a non configuration file with extension .xml is placed inside CF it is highly probable the engine would fail during initialization.
Each engine configuration file is an xml file which must follow the XSD schema reported below:
Table 1. Engine configuration schema
| <xs:schema xmlns:xs="http://www.w3.org/2001/XMLSchema" xmlns:jmu="engine.classifier.schema.jmu.iris.it" targetNamespace="engine.classifier.schema.jmu.iris.it" elementFormDefault="qualified"> <!-- Main element --> <xs:element name="engineConfiguration"> <xs:complexType> <xs:sequence> <xs:element name="processes" type="jmu:processes" minOccurs="1" maxOccurs="1"/> </xs:sequence> </xs:complexType> </xs:element> <!-- A process identifies a class instance which is used by the JMU system to process data. --> <xs:complexType name="process"> <xs:sequence> <xs:element name="javaclass" type="xs:string" /> <xs:element name="description" type="xs:string" /> <xs:element name="property" type="jmu:property" minOccurs="0" maxOccurs="unbounded"/> <xs:element name="timeout" type="xs:long" minOccurs="0" maxOccurs="1" /> <xs:element name="inputs"> <xs:complexType> <xs:sequence> <!-- The uname of the input feature extractor --> <xs:element name="input" type="xs:string" minOccurs="0" maxOccurs="unbounded"/> </xs:sequence> </xs:complexType> </xs:element> </xs:sequence> <xs:attribute name="uname" type="xs:string" /> <xs:attribute name="threaded" type="xs:boolean" /> </xs:complexType> <!-- writing process. Extends process --> <xs:complexType name="outputProcess"> <xs:complexContent> <xs:extension base="jmu:process"/> </xs:complexContent> </xs:complexType> <!-- A list of processes --> <xs:complexType name="processes"> <xs:sequence> <xs:element name="process" type="jmu:process" minOccurs="0" maxOccurs="unbounded" /> <xs:element name="outputProcess" type="jmu:outputProcess" minOccurs="1" maxOccurs="unbounded" /> </xs:sequence> </xs:complexType> <!-- Generic property type --> <xs:complexType name="property"> <xs:sequence> <xs:element name="key" type="xs:string"/> <xs:element name="value" type="xs:string"/> </xs:sequence> </xs:complexType> </xs:schema> |
The main element is engineConfiguration. This element is the container of all process definitions for the engine. The key element in the schema definition is the process element. The process element describes a single custom process instance. outputProcess extends process to provide a clear and special identification of all the processes which are final output processes. An outputProcess tag must be used for all the final elements of the IPC (Image Processing Chain) also if the processes do not produce any output. What is important here is the fact that all the custom processes which result to be the last element of the processing chain have to be identified using outputProcess and not the process XML tag. This information is used by the EngineFactory to built the IPC structure. In fact the EngineFactory starts creating the chain from the last process up to the first one.
Each process XML tag identifies a custom process used inside the IPC. The process tag has the following two attributes:
uname: Is the unique name of the custom process instance. Must be unique among all other CPs.
threaded: A boolean value used to chose among thread execution or not. If not the engine doesn't start the process as a thread but execution is controlled in such a way to invoke execute() only when a child process requires a product to consume. Default value is true.
The tag javaclass must provide the implementation class name for the CP. This class must be available to the engine using a jar located in the engine configuration folder.
Description provides an optional description for the engine. Timeout is used to provide a new value for process timeout. Process timeout is used by EngineProcess to control thread execution. If the current thread is unable to consume products from registered input processes for a time longer than timeout milliseconds, the EngineProcess terminates itself and sends an exception to the engine which would stop execution. It is duty of the CP developer to provide a valid value for this attribute. Default value is 1 minute.
The tag property can be used to provide configuration parameters to the CP instance. Each property is a couple <key,value> which are both strings. These properties are passed to the CP instance while creation phase when the init() method is invoked. These properties can be changed manually while starting the application using system properties. To overwrite a property it is required to start the overall application providing the -D system property value. So to overwrite the property fileName for the CP myReader it is required to pass the following parameter: -DmyReader@fileName=/home/users/files/theFile.mpg.
The tag inputs is used to associate the CP with all the input processes. Each process can have zero or an unbounded number of inputs. The only process which has no inputs is the first process of the IPC.
At the moment the CMU module requires following external libraries:
ffmpeg version 51.27.0 (http://ffmpeg.mplayerhq.hu/)
log4cplus version 1.0.2 (http://log4cplus.sourceforge.net/)
JMU requires other java external libraries:
log4j version 1.2.13 (http://logging.apache.org/log4j/docs/)
XMLBean (http://xmlbeans.apache.org/index.html)
In order to compile the sources the following external dependencies are required:
ant version 1.6.5
ant cpp task (from antcontrib project)
gnu C/C++ compiler (at least version 4.1.1)
To compile documentation other external libraries are required:
Apache FOP version 0.93 (http://xmlgraphics.apache.org/fop/download.html)
DocBook version 1.70.1 (http://sourceforge.net/projects/docbook/)
The overall architecture is made of 5 components. Three of them are C++ modules meanwhile the last two are java libraries.
Here is the list of the released components:
CMU-core
CMU-core is a static library which contains the basic interfaces and some utility classes. The shared library has name libcmu-core.a
CMU-mpeg
CMU-mpeg is an MPEG specific implementation of the CMU-core interfaces. Here developers can find all the classes to work with to develop their MPEG based applications. This module is released as a shared library with name libcmu-mpeg.so
JMU-jni-bridge
JMU-jni-bridge is the JNI bridge which links java with CMU-mpeg implementation. This component is released as a shared library with name libjmu-mpeg-jni.so
JMU-core
JMU-core is the equivalent of CMU-core but for java side of the project. This component contains all the interfaces and utility classes. This component is released as a java library with name jmu-core.jar.
JMU
JMU is the Java Media Utility java package which interfaces with JMU-mpeg using JMU-jni-bridge to read data out of an MPEG stream. This component provides classes which developers can use inside their applications. This component is released as a java library with name jmu-mpeg.jar
In order to use the JMU the following C++ libraries are required: libcmu-mpeg.so. libjmu-mpeg-jmi.so is required when working with jmu-mpeg.jar and must be loaded into JRE before loading jmu-mpeg.jar classes.
libcmu-mpeg.jar must be referred in LD_LIBRARY_PATH before starting java application which uses jmu classes.
This section details some example on how to use JMU to read media files and how to integrate custom algorithm inside JMU engine framework.
Here are shown some java code examples which explain how to use JMU library to process MPEG files.
Initialize the libraries:
try{
      JNIInitializer.getInstance().initLibraries(new String
      []{"jmu-mpeg-jni"}); }catch(Exception e){ e.printStackTrace(); return;
      }
Create an MPEG file reader:
IMediaReader mr = new
      MPEGFileReader();
Open a media file:
mr.openStream("myfile.mpeg");
Retrieve all available video streams in the file:
List<Integer>
      videoStreams = mr.getVideoStreams();
Create a video stream reader for the first video stream (or the one you prefer):
IVideoStreamReader vsr =
      mr.createVideoStreamReader(videoStreams.get(0).intValue());
If you require to extract DCT coeffs it is required to activate DCT debug option:
vsr.setDebugDCT(true);
As before, if you require to extract motion, it is required to activate motion debug option:
vsr.setDebugMV(true);
Extract the next video RGB frame out of the stream:
IFrame frame =
      vsr.getNextIFrame(FrameFormat.INT_RGB);
Extract DCT Y matrix for the current frame:
DCTMatrix dctm =
      frame.getStreamDct(IFrame.Y);
Extract forward motion for the current frame (motion is not available for I frame):
MVMatrix motion =
      frame.getForwardMotion();
There are no binary artifacts released at the moment. The only way to get a binary version is to download sources from svn repository and build them.
The project is made up of two separated eclipse projects: CMU and JMU. This reflects the overall project structure. It is required to check-out both the projects in order to complete build process.
The repository has following URL: https://jmu.svn.sourceforge.net/svnroot/jmu
Check-out both CMU and JMU projects.
In CMU/etc there is the file env.sh.template. This file can be used as a shell script to init environment. Due to the fact that each developer has its own environment, it is required to configure this file in order to reflect specific environment configuration. TO configure the file just rename the file from env.sh.template to env.sh and appropiately set the required environment variables.
To note that to compile C/C++ code has been used the ant cpp task. This task support various platform other than linux. We have never tested the scripts with such platforms at the moment. For shure the script seems not working with MAC OS with FreeBSD.
A the moment there is no a unique global script to compile all the artifacts, so it is required to proceed manually. Pleas follow these steps:
configure CMU/etc/env.sh
cd CMU/etc
. env.sh
cd CMU/components/core
ant install
cd CMU/components/mpeg-reader
ant install
cd JMU/components/core
ant
cd JMU/components/mpeg-reader
ant
cd JMU/components/mpeg-reader-jni-bridge
ant install
cd JMU/apps/demo
ant
If all the previous steps completed successfully, you are ready to start the simple player demo as follow:
java -cp $CLASSPATH it.iris.jmu.demo.MPEGSimplePlayerDemo -show --log-level OFF
To activate log just replace --log-level OFF with --log-level DEBUG.
Other examples follow:
java -cp $CLASSPATH it.iris.jmu.demo.MPEGDemo -show --log-level OFF -motion --in /home/paolo/tmp/T90_sif.mpg
java -cp $CLASSPATH it.iris.jmu.demo.MPEGDemo -show --log-level DEBUG -dct --dct-component Y -bef --in ../../examples/movies/T90_sif.mpg
java -cp $CLASSPATH it.iris.jmu.demo.MPEGSimplePlayerDemo --log-level OFF
The -motion option tells to the demo application to display motion vectors on top of the frames. Motion vectors are shown only for P and B image types. I-type mages would be displayed without motion vectors.
The option -dct can be used to show an additional image with DCT coefficients. This test is not much usefull.
In both cases the frame flow is stoped after each frame. To move to the next frame it is required to press "enter" inside the console.
The it.iris.jmu.demo.MPEGSimplePlayerDemo is sort of fast player. This can be used to play videos.
To start the engine framework here is a simple command:
java -Xms256M -Xmx256M -Dcat-classifier@threshold=50000.0 -DpluginConfFile=/home/paolo/workspace/dev/JMU.sf/apps/demo/plugin.properties -cp $CLASSPATH it.iris.jmu.classifier.ClassifierApplication --log-level OFF --conf-path /home/paolo/workspace/dev/JMU.sf/apps/video-feature-extractor/engine-cfg/
The command requires use fo -Xms and -Xmx options to specify an adequate amount of memory. The java system option <process-name>@<process-property> can be used to synamically set a value for a process property. This value overwrites the value in configurationfiles. System option pluginConfFile specify the configuration file for plugin service. Finally --conf-path profide the path to the folder containing the engine configuration files and custom jar files.